> ## Documentation Index
> Fetch the complete documentation index at: https://docs.usesolari.ai/llms.txt
> Use this file to discover all available pages before exploring further.
# Confluence
Only team admins can connect to Atlassian products (Confluence or Jira). Team admins grant Confluence access to all agents in the team (note you can still control who on your team has access to which agents). \
\
If you're not sure who the admin for your team is, navigate to [Members and Permissions](https://app.usesolari.ai/members) to find your teams admin.
## How Confluence integrations work in Solari
1. Once your team has been connected to a workspace, Solari only has access to the specific pages and spaces that users explicitly give it access to.
2. Users give access to pages on a `per agent basis`. That means your Solari instance only has access to the pages that each agent has been granted access to (either by the `team admin`, `agent-admin` or anyone with `edit` access to the agent. \
\
See `Agent Permissions` for more details
Remember you can control what access members have to each agent, to enforce any role-based data-access permissions.
3. Each Solari agent only has access to the Confluence pages it has been explicitly given access to. \
\
See [Add sources](https://docs.usesolari.ai/essentials/add_sources) to see how agents get access to Confluence pages as sources.
## Connect to Confluence (Atlassian)
1. Navigate to [Settings](https://app.usesolari.ai/settings).
2. If you're the `team admin`, you'll see "Atlassian Connection" under "Integrations"
3. Tap `Log into Jira and Confluence`
4. You'll be navigated to log into Atlassian. Use your Jira/Confluence credentials to log in and grant Solari access
Solari only READS access from Confluence. No Solari agents will write to Confluence.
5. Once successful, you'll be navigated to the Configure Atlassian page. Here you can `remove` your account or select a different workspace
## Choose your workspace
1. Navigate to [**Settings**](https://app.usesolari.ai/settings)>Integrations. Click "Configure Atlassian"
2. You'll see a list of available workspaces. Select the one you'd like to give Solari access to
## Remove your connection
1. Navigate to [**Settings**](https://app.usesolari.ai/settings)>Integrations. Click "Configure Atlassian"
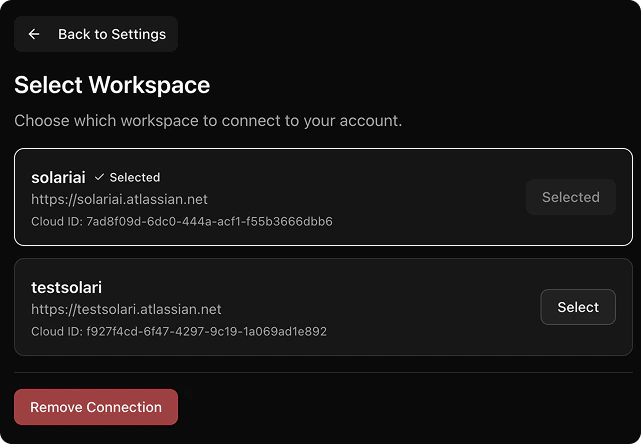 2. Click `Remove connection`
3. Confirm `Remove connection` in the confirmation dialog
Your Confluence (Atlassian) connection is now removed.
2. Click `Remove connection`
3. Confirm `Remove connection` in the confirmation dialog
Your Confluence (Atlassian) connection is now removed.