> ## Documentation Index
> Fetch the complete documentation index at: https://docs.usesolari.ai/llms.txt
> Use this file to discover all available pages before exploring further.
# Manage agent sources
# **Add sources**
Sources are what each agent uses to answer your users questions.
1. Open the agent by clicking on it from the `Agents` list (navigating either via the left-nav or `cmd+k` shortcut)
2. Toggle `Edit mode` on the top let corner
To toggle `Edit` mode on and add a source, you'll need to either be the `team-admin`, `agent-admin` or have `edit` access to the agent
3. In the **Add New Sources** menu, select the channel you'd like to add the source from.
4. Once prompted, add the source (see
For sources added from external tools (i.e. Slack, Jira), you'll have to make sure your Solari account is connected to those accounts. \
\
Check [Settings](https://app.usesolari.ai/settings) to see if your account is integrated already. See [docs](/guides/getting-started-in-solari/integrations) to see how to integrate to your chosen channel.
5. Choose the source type you want (e.g., docs, PDFs, Slack, Confluence, website).
6. Connect or upload the source
7. When prompted add a `nickname` and a `source description`
`nickname` is how your agent will refer to this source. You can trigger the agent to use a specific source by using the nickname in your query (i.e. @meeting\_notes - what was the first due date?
`source description`is one of the fields our model-router chooses which source to use for a query, if a `nickname` is *not* provided. \
\
A good `source description` ensures our model-router accurately chooses this source for the queries pertaining to it.
See channel-specific flows below.
## Slack Channels
1. Make sure you're in your chosen agent (via the `Agents` page or the `cmd+k` shortcut).
2. Turn `edit` mode on
3. In `Add New Sources` , click the `Slack` tile
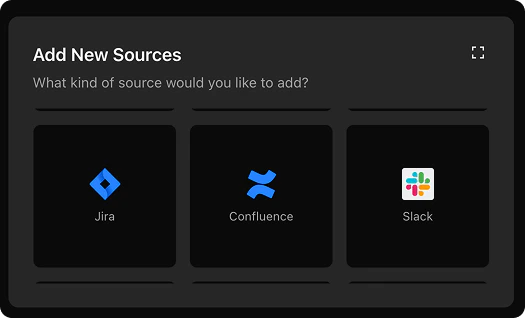 4. You can search for channels by channel name. Select the channels you'd like to give this agent access to
Solari can only see channels that it's explicitly been invited to. So make sure to invite Solari Slack Bots to the channels you'd like to give it access to
1) Open `Edit Settings` (opening the menu from `⋮` in the top right corner of the channel)
4. You can search for channels by channel name. Select the channels you'd like to give this agent access to
Solari can only see channels that it's explicitly been invited to. So make sure to invite Solari Slack Bots to the channels you'd like to give it access to
1) Open `Edit Settings` (opening the menu from `⋮` in the top right corner of the channel)
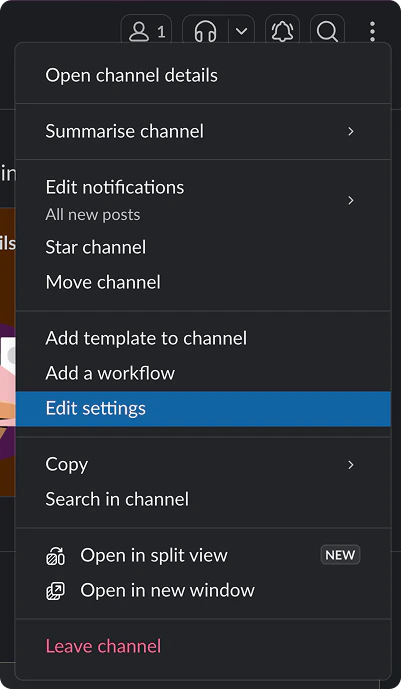 2. Navigate to**Integrations>** Add Apps
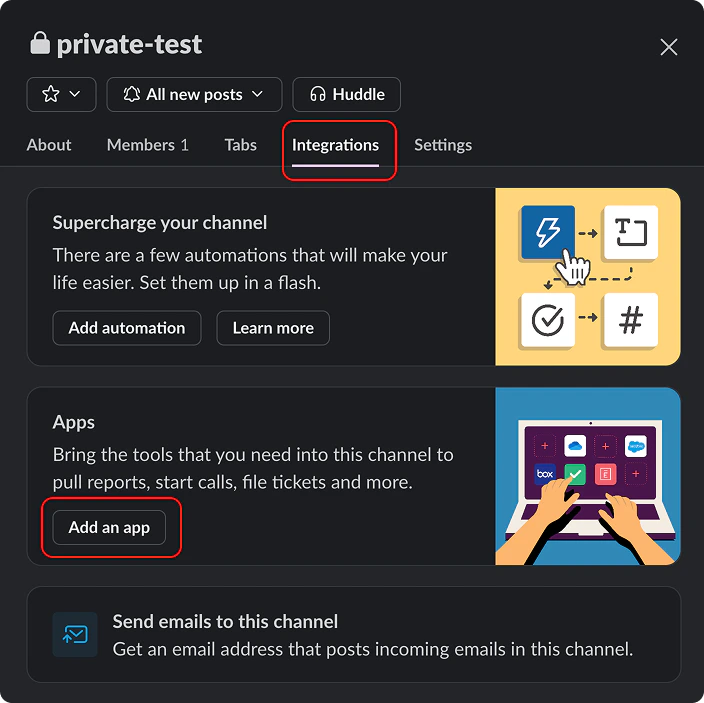 3. Find `Solari Slack Bots` and click `Add`
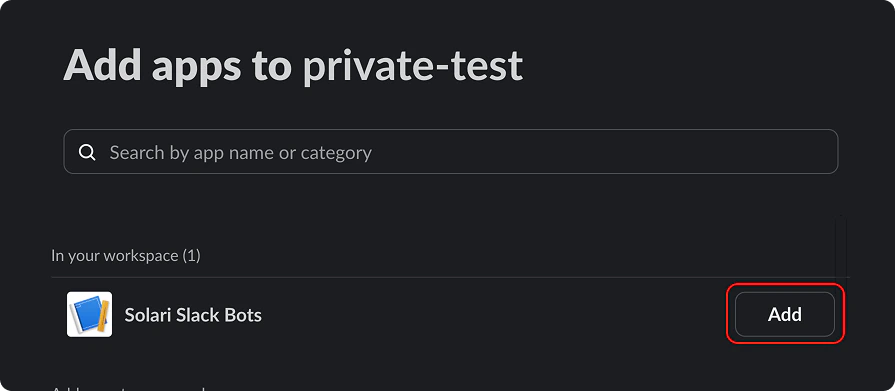 **Solari agents can now access data from this channel!**
5. With the channels you'd like to sync selected, tap `Add selected` to start the sync job
6. If successful, you'll see the channels you've added and their sync status in the `Slack Sync Job` window in the bottom right hand corner
| Status | Description |
| --------- | --------------------------------------- |
| `running` | The channel is currently being synced |
| `queued` | The channel is on the list to be synced |
| `done` | The channel has been synced |
| `error` | There was an error syncing this channel |
7. As the channels are synced, you'll see them in the `Current Sources` list in `Edit Agent`. Click the `source description` of each source.
8. In the input field, provide some detail about what is in this Slack channel and when the agent should choose this source to answer a given question.
Once your channel has been successfully added, you can reference it in chat using the `#channel-name` as the `@nickname`
**Solari agents can now access data from this channel!**
5. With the channels you'd like to sync selected, tap `Add selected` to start the sync job
6. If successful, you'll see the channels you've added and their sync status in the `Slack Sync Job` window in the bottom right hand corner
| Status | Description |
| --------- | --------------------------------------- |
| `running` | The channel is currently being synced |
| `queued` | The channel is on the list to be synced |
| `done` | The channel has been synced |
| `error` | There was an error syncing this channel |
7. As the channels are synced, you'll see them in the `Current Sources` list in `Edit Agent`. Click the `source description` of each source.
8. In the input field, provide some detail about what is in this Slack channel and when the agent should choose this source to answer a given question.
Once your channel has been successfully added, you can reference it in chat using the `#channel-name` as the `@nickname`
 ## Jira tickets
1. Make sure you're in your chosen agent (via the `Agents` page or the `cmd+k` shortcut).
2. Turn `edit` mode on
3. In `Add New Sources` , click the `Jira` tile
4. Search for the tickets you'd like included
You can search by passing a JQL expression, or searching with strings you know are in the chosen tickets\
\
JQL expressions can be helpful for adding all tickets in a collection of tickets (i.e. of a particular user, team or project)
5. Select the tickets you'd like added and tap "Add tickets"
6. You'll see a new item in your `Sources List` called `jira`. This represents the collection of tickets you've given this agent access to
7. Click the `source description` of each source.
8. In the input field, provide some detail about what is in this Slack channel and when the agent should choose this source to answer a given question.
## Confluence pages
1. Make sure you're in your chosen agent (via the `Agents` page or the `cmd+k` shortcut).
2. Turn `edit` mode on
3. In `Add New Sources` , click the `Confluence` tile
4. You can search for Confluence pages to add in 3 ways:
## Jira tickets
1. Make sure you're in your chosen agent (via the `Agents` page or the `cmd+k` shortcut).
2. Turn `edit` mode on
3. In `Add New Sources` , click the `Jira` tile
4. Search for the tickets you'd like included
You can search by passing a JQL expression, or searching with strings you know are in the chosen tickets\
\
JQL expressions can be helpful for adding all tickets in a collection of tickets (i.e. of a particular user, team or project)
5. Select the tickets you'd like added and tap "Add tickets"
6. You'll see a new item in your `Sources List` called `jira`. This represents the collection of tickets you've given this agent access to
7. Click the `source description` of each source.
8. In the input field, provide some detail about what is in this Slack channel and when the agent should choose this source to answer a given question.
## Confluence pages
1. Make sure you're in your chosen agent (via the `Agents` page or the `cmd+k` shortcut).
2. Turn `edit` mode on
3. In `Add New Sources` , click the `Confluence` tile
4. You can search for Confluence pages to add in 3 ways:
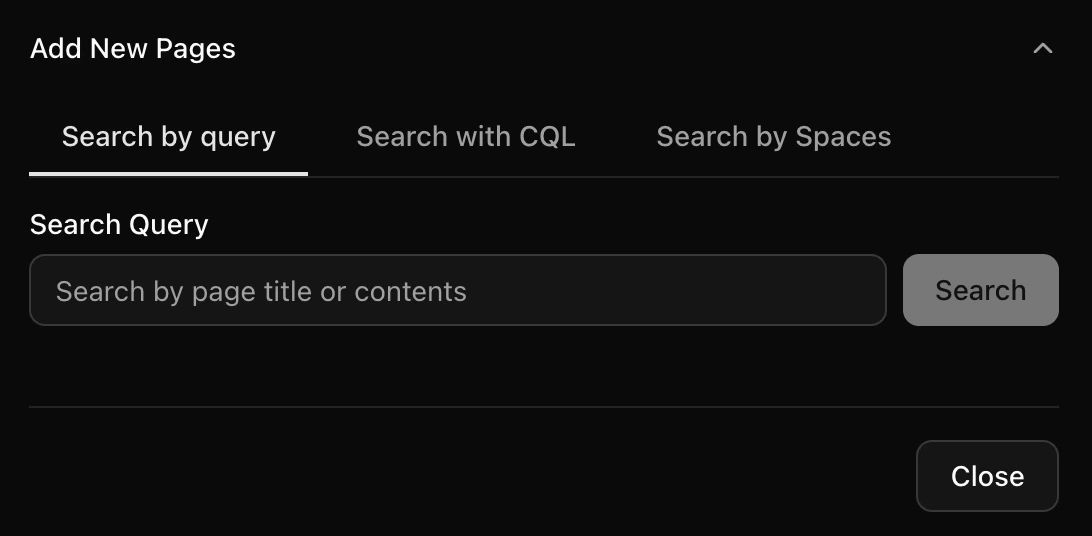 1. Enter your query and tap `Search`
2. Select the pages you'd like to add as sources
CQL expressions can be helpful for adding all tickets in a collection of tickets (i.e. of a particular user, team or project)
1. Enter your query and tap `Search`
2. Select the pages you'd like to add as sources
CQL expressions can be helpful for adding all tickets in a collection of tickets (i.e. of a particular user, team or project)
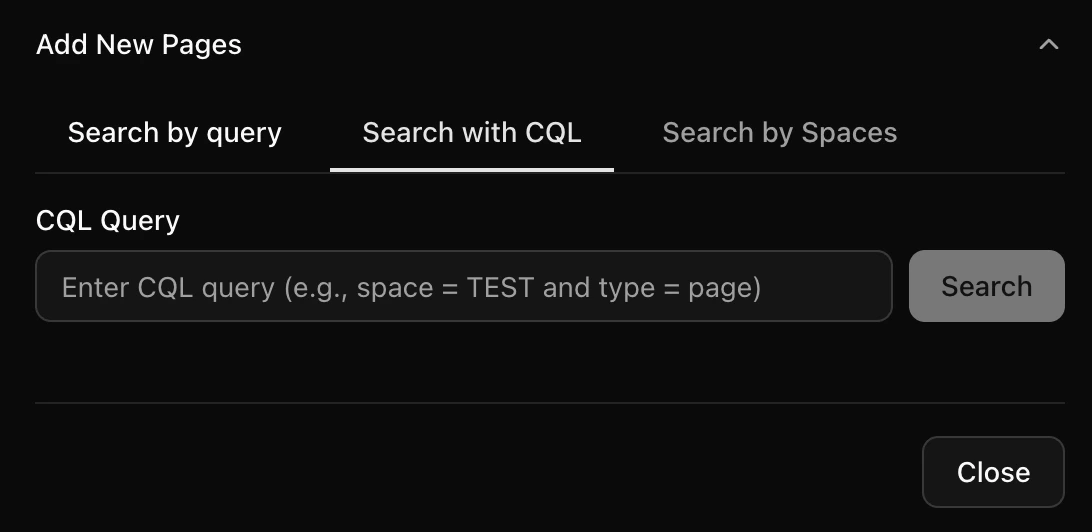 1. Enter your CQL expression and tap `Search`
2. Select the pages you'd like to add as sources
1. Enter your CQL expression and tap `Search`
2. Select the pages you'd like to add as sources
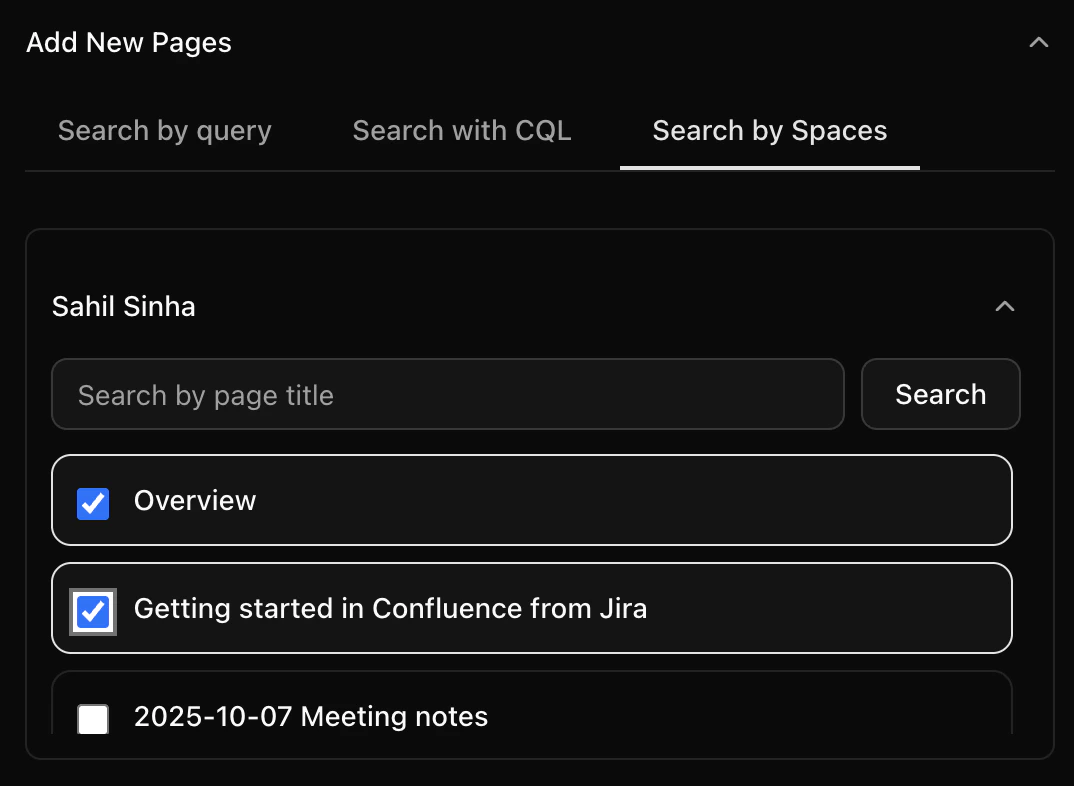 1. You'll see a list of your Confluence spaces. Click one to see the pages in that space
2. Select the pages you'd like added as sources
5. With all the pages you'd like added as sources, tap `Add selected`
6. You'll see each page you added in your `Current Sources` list. Click the `source description` of each source.
7. In the input field, provide some detail about what is in this Slack channel and when the agent should choose this source to answer a given question.
## Documents
*Valid file types: *`.pdf`*, `.docx`, `.doc`, `.txt`, \_*`.md`
1. Make sure you're in your chosen agent (via the `Agents` page or the `cmd+k` shortcut).
2. Turn `edit` mode on
3. In `Add New Sources` , click the `Document` tile
4. Add the chosen document either via drag-and-drop, or using the file picker
5. Enter a `source-nickname` and `source-description`
6. Tap `Done`
## Websites
*Valid URL type: any publicly accessible URL*
1. Make sure you're in your chosen agent (via the `Agents` page or the `cmd+k` shortcut).
2. Turn `edit` mode on
3. In `Add New Sources` , click the **Website** tile
4. Paste the website URL
5. Enter a source‑nickname
6. Tap **Done**
7. You'll see each page you added in your `Current Sources` list. Click the `source description` of each source.
8. In the input field, provide some detail about what is in this Slack channel and when the agent should choose this source to answer a given question.
## Tables
\_Valid file types: *`.csv`*, *`.xlsx`*, \_`.tsv`
1. Make sure you're in your chosen agent (via the `Agents` page or the `cmd+k` shortcut).
2. Turn `edit` mode on
3. In `Add New Sources` , click the **Table** tile
4. Upload the table file (drag‑and‑drop or file picker)
5. Enter a `source-nickname`
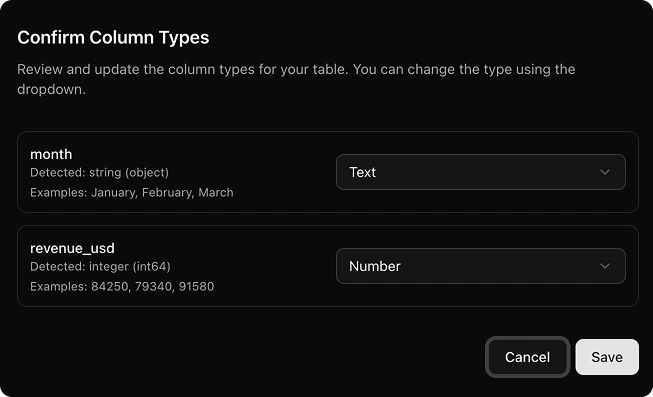
6. When prompted, review column types/metadata. Tap `Save` to confirm each column's name and datatype.
Solari uses this metadata to build accurate SQL queries using your query. Providing accurate metadata helps our text-to-code modles run accurately the first time
For tables you've uploaded that **don't** have confirmed metadata, you'll see an alert next to their name in the `Sources list`. Clicking that alert will trigger the metadata confirmation flow. \
\
Failing to confirm metadata will prevent our text-to-code models from generating accurate SQL for your code specifically.
1. You'll see a list of your Confluence spaces. Click one to see the pages in that space
2. Select the pages you'd like added as sources
5. With all the pages you'd like added as sources, tap `Add selected`
6. You'll see each page you added in your `Current Sources` list. Click the `source description` of each source.
7. In the input field, provide some detail about what is in this Slack channel and when the agent should choose this source to answer a given question.
## Documents
*Valid file types: *`.pdf`*, `.docx`, `.doc`, `.txt`, \_*`.md`
1. Make sure you're in your chosen agent (via the `Agents` page or the `cmd+k` shortcut).
2. Turn `edit` mode on
3. In `Add New Sources` , click the `Document` tile
4. Add the chosen document either via drag-and-drop, or using the file picker
5. Enter a `source-nickname` and `source-description`
6. Tap `Done`
## Websites
*Valid URL type: any publicly accessible URL*
1. Make sure you're in your chosen agent (via the `Agents` page or the `cmd+k` shortcut).
2. Turn `edit` mode on
3. In `Add New Sources` , click the **Website** tile
4. Paste the website URL
5. Enter a source‑nickname
6. Tap **Done**
7. You'll see each page you added in your `Current Sources` list. Click the `source description` of each source.
8. In the input field, provide some detail about what is in this Slack channel and when the agent should choose this source to answer a given question.
## Tables
\_Valid file types: *`.csv`*, *`.xlsx`*, \_`.tsv`
1. Make sure you're in your chosen agent (via the `Agents` page or the `cmd+k` shortcut).
2. Turn `edit` mode on
3. In `Add New Sources` , click the **Table** tile
4. Upload the table file (drag‑and‑drop or file picker)
5. Enter a `source-nickname`
6. When prompted, review column types/metadata. Tap `Save` to confirm each column's name and datatype.
Solari uses this metadata to build accurate SQL queries using your query. Providing accurate metadata helps our text-to-code modles run accurately the first time
For tables you've uploaded that **don't** have confirmed metadata, you'll see an alert next to their name in the `Sources list`. Clicking that alert will trigger the metadata confirmation flow. \
\
Failing to confirm metadata will prevent our text-to-code models from generating accurate SQL for your code specifically.

 7. Tap **Done**
8. You'll see each page you added in your `Current Sources` list. Click the `source description` of each source.
9. In the input field, provide some detail about what is in this Slack channel and when the agent should choose this source to answer a given question.
# **Delete sources**
Sources can always be deleted in 2 ways:
1. tapping the `trash-can`icon in `Sources list`
2. Right clicking the `source-tile` in the 'Add Source Dialog', tapping `delete`, and confirming in the dialog
7. Tap **Done**
8. You'll see each page you added in your `Current Sources` list. Click the `source description` of each source.
9. In the input field, provide some detail about what is in this Slack channel and when the agent should choose this source to answer a given question.
# **Delete sources**
Sources can always be deleted in 2 ways:
1. tapping the `trash-can`icon in `Sources list`
2. Right clicking the `source-tile` in the 'Add Source Dialog', tapping `delete`, and confirming in the dialog